Connecting to Isambard
Note
You will need an SSH key-pair to access Isambard.
Linux
The following stanza is required in your local ~/.ssh/config in order to traverse the bastion hosts transparently and enable SCP usage:
# --- GW4 Isambard --- #
Host *isambard.gw4.ac.uk *isambard
  User XX-USERNAME
  ForwardAgent yes
  ForwardX11 yes
  ServerAliveInterval 60
  IdentityFile ~/.ssh/id_rsa

# Isambard: MACS
Host login-01.isambard.gw4.ac.uk login-01.isambard login.isambard
  Hostname login-01
  ProxyCommand ssh isambard.gw4.ac.uk 'nc %h %p'

Host login-02.isambard.gw4.ac.uk login-02.isambard
  Hostname login-02
  ProxyCommand ssh isambard.gw4.ac.uk 'nc %h %p'

# Isambard: XCI
Host xcil00.isambard.gw4.ac.uk xcil00.isambard xci.isambard
  Hostname xcil00
  ProxyCommand ssh isambard.gw4.ac.uk 'nc %h %p'

Host xcil01.isambard.gw4.ac.uk xcil01.isambard
  Hostname xcil01
  ProxyCommand ssh isambard.gw4.ac.uk 'nc %h %p'

# Isambard: A64FX
Host gw4a64fxlogin00.isambard.gw4.ac.uk a64fxlogin00.isambard a64fx.isambard
  Hostname gw4a64fxlogin00
  ProxyCommand ssh isambard.gw4.ac.uk 'nc %h %p'

Host gw4a64fxlogin01.isambard.gw4.ac.uk a64fxlogin01.isambard
  Hostname gw4a64fxlogin01
  ProxyCommand ssh isambard.gw4.ac.uk 'nc %h %p'

# Isambard: Phase-3
Host p3login01.isambard.gw4.ac.uk p3login01.isambard p3login.isambard
  Hostname p3login01
  ProxyCommand ssh isambard.gw4.ac.uk 'nc %h %p'
Caution
Update the ~/.ssh/config with your details:-
Substitute
XX-USERNAMEwith your Isambard usernameThe
IdentityFilepoints to the SSH key (private) that will be used for connecting to Isambard, the default for most users will be~/.ssh/id_rsa. If you are using a different key Eg.~/keystore/isambard, the entry should beIdentityFile ~/keystore/isambardWe recommend you overwrite previous versions of this configuration when updating in to ensure your configuration matches the documentation
To test the connection please first try connecting to the MACS system. This will ensure any initial configuration is performed for the first-time user.
MACS - Multi-Architecture Comparison System
ssh login-XX.isambard or ssh login.isambardXCI - Marvell Thunder X2
ssh xcil00.isambard or ssh xci.isambardA64FX - Fujitsu A64FX
ssh a64fxlogin00.isambard or ssh a64fx.isambardPhase-3 - GPUs and Milan
ssh p3login01.isambard or ssh p3login.isambardRemember to replace XX-USERNAME with your Isambard username.
Windows
SSH keys can be created with Puttygen and managed with Putty’s Pageant to make them available to Putty and WinSCP. Especially useful if you use a passphrase to protect your SSH private key.
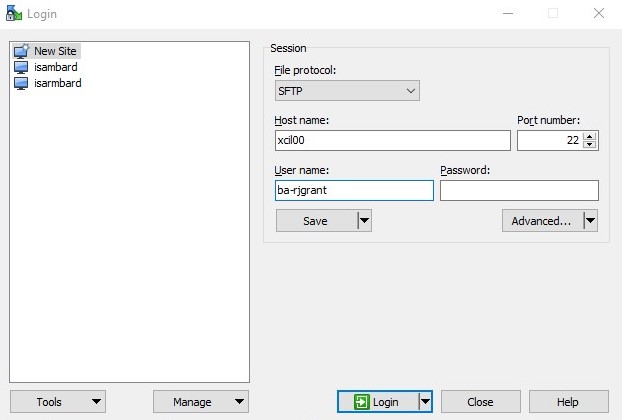
If you are using windows then the simplest way to set up access to Isambard is to with WinSCP:
First create a New Site
Enter Hostname and your Username
Note that for Phase 2 (xcil00/01) the names are ‘ex’, ‘see’, ‘eye’, ‘el’, ‘zero’, ‘zero’/’one’.
For Phase 1 replace this with login-01/02 as per the ssh config above.
Next click on Advanced and Connection -> Tunnel.
Select to ‘Connect through SSH tunnel’
Enter the proxy hostname ‘isambard.gw4.ac.uk’ and your username.
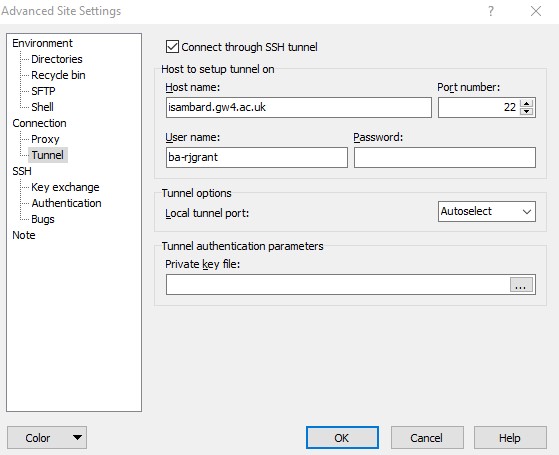
Click OK and Save, then Login and Enjoy …
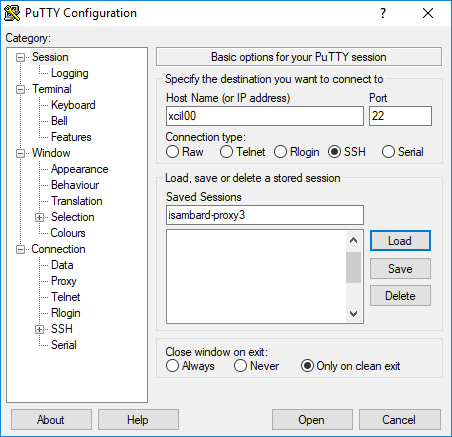
Putty provides a shell to a remote server. As in the instructions for Linux a proxy command will be used to access the login node of the system you want.
Set hostname to the the login node of the Isambard system, such as xcil00
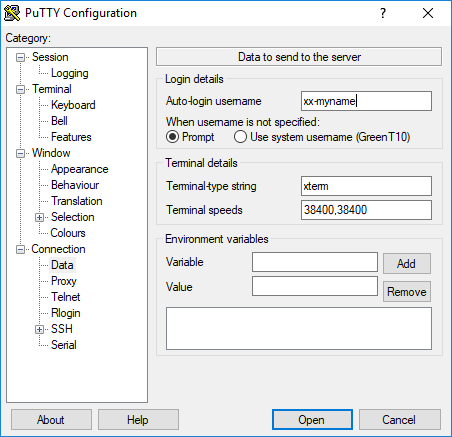
Next click on Connection -> Data and add your username to ‘Auto-login username’ e.g. xx-myname
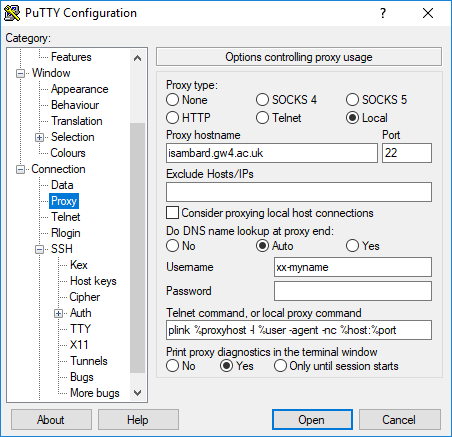
Next click on Connection -> Proxy
Select ‘Local’ for ‘Proxy type’
Enter ‘isambard.gw4.ac.uk’ for ‘Proxy hostname’
Enter your username for ‘Username’
Enter ‘plink %proxyhost -l %user -agent -nc %host:%port’ for ‘Telnet command, or local proxy command’
Make sure Pageant is used when using the above command since plink needs to use the ssh key information.
Click back to Session and save your connection settings and connect. If using ssh keys you should not need to use a password.